


Almost every beginner drops the hoop several times when starting out. This is normal and part of learning.
Quick start: Stand in a stable position, place the hoop horizontally against your lower back and give it a strong, straight push. Then shift your weight back and forth or from side to side. Large hip circles are not necessary.
Unsure which hoop is right for you? See the Hula Hoop Buying Guide.
1. Parallel stance or split stance?
Neither stance is inherently right or wrong. Both positions work. What matters is the position in which you stand securely and feel the rhythm best.
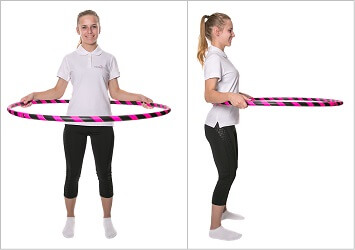
Parallel stance: Place your feet hip-width apart and parallel. Keep your knees slightly bent, your shoulders relaxed and your back upright. Place the hoop against your lower back at waist height. First turn your upper body and the hoop slightly to the right and left to check that you have enough room to move. After the initial push, shift your weight rhythmically from right to left.
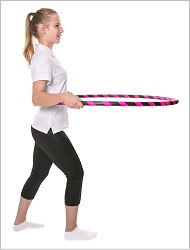
Split stance: Place one foot about 20 to 30 centimetres in front of the other. Keep both feet flat on the ground rather than rising onto your toes or heels. After the initial push, shift your weight back and forth. The split stance is often easier if this movement feels more natural to you.

2. How to set the hoop in motion
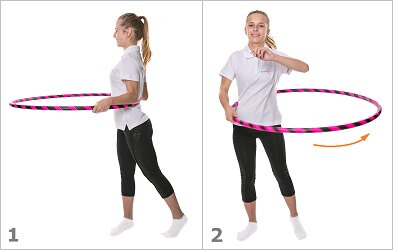
Turn your upper body and the hoop slightly in one direction, then send the hoop firmly in the opposite direction. The initial push should be strong, straight and parallel to the ground. Immediately begin shifting your weight forwards and backwards or from side to side.
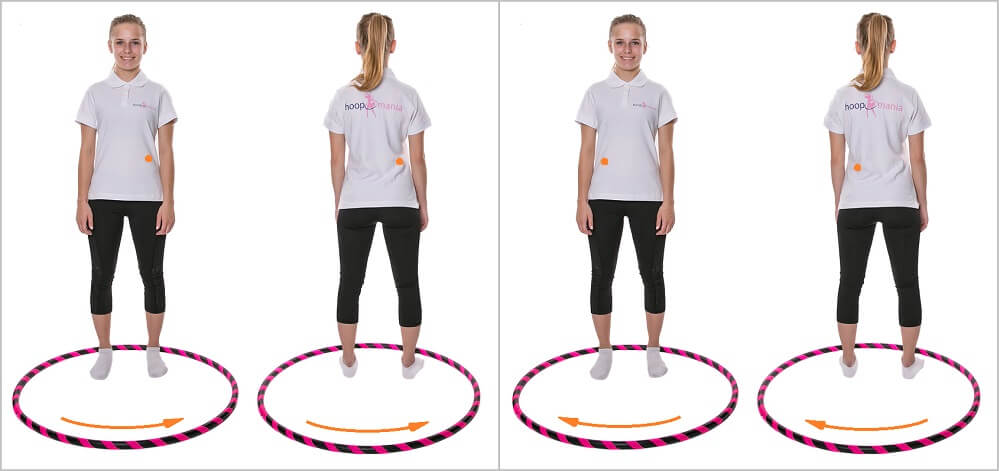
As it rotates, the hoop repeatedly touches two opposite areas of the body. These are the contact points. If the hoop rotates to the left, one contact point is at the front left and the other at the back right; the sides reverse when the hoop rotates in the opposite direction. Use small, rhythmic counter-movements at these points.
3. Stop and change direction
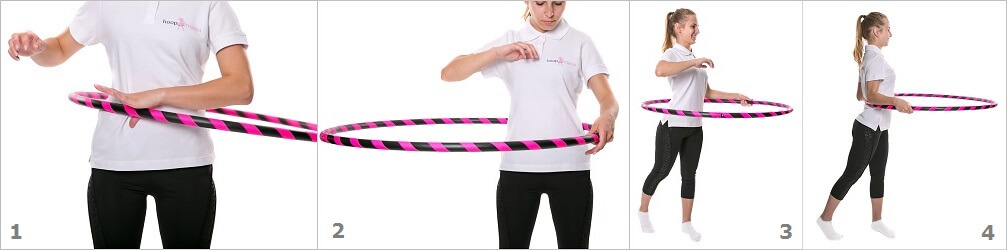
First, reduce the pace. Hold one hand beside your body and let the hoop come into it in a controlled way. Catch it securely, place it horizontally again and start it in the opposite direction. Do not suddenly block the hoop against its direction of rotation.
Practise both directions regularly, without putting yourself under pressure. One direction almost always feels easier at first.
When the hoop starts to drop

Bend your knees slightly and increase the pace of your body movements for a few rotations. To do this, use the strength of your legs and feet. Small, quick movements usually work better than large, hectic movements.
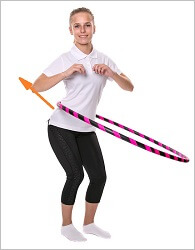

Slowly turn in the same direction as the hoop. This reduces the hoop’s speed relative to your body. Use this variation to regain control or stop the hoop more easily.
4. Warm-up before hooping
A short warm-up can help you prepare your movement direction and rhythm. Choose a few controlled movements that feel comfortable, then begin hooping gradually. See the complete Hula Hoop warm-up and mobility routine.
5. Which hula hoop is right for you?
The right hoop depends not only on weight, but also on your height, training goal, movement experience and personal sensitivity.
Massage Hula Hoop with massage elements
Massage models apply more noticeable pressure. Start with very short intervals and pay attention to your skin and the tissue beneath it. Severe pain or pronounced bruising is not a required effect of training.
Classic Hula Hoop without massage elements
Classic hoops are suitable for waist hooping, basic movements and, depending on the design, introductory hoop-dance elements. Diameter, tube thickness and rotation speed all affect the learning experience.
Hula Hoop for beginners View massage hula hoops View hula hoops without massage elements Personal guidance in the Hula Hoop Buying Guide
We recommend Hula Hoops based on the person.
6. FAQ for beginners
Why does the hoop fall immediately?
Check whether it lies horizontally against your lower back, whether the initial push is strong and straight and whether you start shifting your weight immediately.
How long should I train for at the beginning?
Massage Hula Hoop: Start with very short intervals, for example around one minute at a time, and take breaks.
Classic Hula Hoop without massage elements: Short practice intervals are useful here too. Increase the total duration gradually.
Are bruises normal?
Massage Hula Hoop: Due to the stronger pressure at certain points, bruising is more likely to occur. Severe or recurring bruises are a reason to take a break.
Classic Hula Hoop without massage elements: Pronounced bruises are less typical. Check hard edges, connections, training duration and your sensitivity.
Which hoop is suitable for learning?
Massage Hula Hoop: Choose this type only if the pressure feels appropriate for you and suits your goal. A heavier hoop is not automatically easier for beginners.
Classic Hula Hoop without massage elements: A sufficiently large hoop usually rotates more slowly and gives you more time to react.
Do I have to rotate my hips while hula hooping?
No. For waist hooping, forward-back or side-to-side movements are usually more effective than large hip circles.
Should I hoop in both directions?
Yes, as long as both directions feel comfortable. The less familiar direction may be more difficult at first.
When should I change the direction of rotation?
Change direction after a short, controlled interval or when one side of your body is working noticeably harder. Stop the hoop safely before starting it in the opposite direction.
What do I do if I have pain?
Massage Hula Hoop: Pause immediately and do not train through severe pressure pain.
Classic Hula Hoop without massage elements: Also pause and check your posture, contact point, hoop edge and training duration.
Can I lose weight with Hula Hoop?
Hooping can add more movement to everyday life. However, neither massage nor classic hoops can guarantee a specific amount of weight loss.
When should I seek medical advice beforehand?
If you have existing symptoms, have recently had surgery, are pregnant, have recently given birth or have other medical concerns, seek individual professional advice before training.
Every new attempt helps you progress
Everyone who becomes confident at hooping has picked up the hoop countless times. It is normal for the hoop to fall while you are learning. Every new attempt helps you understand your stance, initial push and rhythm more clearly.